Description
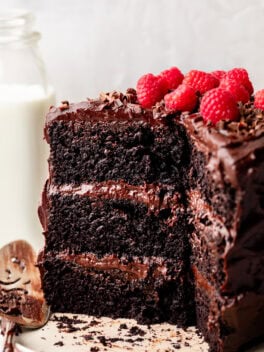
The BEST Gluten Free Chocolate Cake of your dreams has entered the chat! This cake is incredibly moist, extra fudge-like, and paired with the most delicious chocolate ganache frosting. Such an easy cake to make for any occasion and so customizable to serve up! If you’re a chocolate cake fiend, this one is for you!
Ingredients
For the chocolate cake:
- 2 cups gluten free all-purpose flour
- ¾ cup dutch-process cocoa powder
- 2 tablespoons black cocoa powder
- 2 teaspoons baking soda
- 1 teaspoon baking powder
- 1 teaspoon fine sea salt
- 1 cup packed dark brown sugar
- ¾ cups granulated sugar
- 1 cup buttermilk
- 1 cup strong black coffee, warm
- 2 teaspoons vanilla extract
- ½ cup vegetable oil
- 2 large eggs
For the chocolate ganache frosting:
- 1 ¾ cups heavy whipping cream
- 1 cup packed dark brown sugar
- 10 ounces unsweetened chocolate, finely chopped- see notes
- 8 tablespoons unsalted butter, cubed
- 1 teaspoon instant espresso powder, optional
- ½ teaspoon fine sea salt
Instructions
For the chocolate cake:
- Position a rack in the middle of the oven. Then preheat the oven to 350°F. This cake can be made using 3 (6-inch) round cake pans, 2 (8-inch) round cake pans, or in a 9 x 13-inch (sheet cake) baking pan. Generously grease the baking pan(s) and line with parchment paper and damp cake strips (optional!) for good measure. Then set aside.
- In a large bowl, combine the flour, both cocoa powders, baking soda, baking powder, salt, brown sugar, and granulated sugar. Stir the dry ingredients very well to thoroughly combine.
- Make a well in the middle of the bowl and pour in the buttermilk, coffee, extract, oil, and eggs. Whisk the mixture together until the batter is fully combined. This chocolate cake batter will be very runny. Divide the cake batter evenly into the cake pan(s). I like to use a kitchen scale to help get the precise weight of each cake pan.
- Bake the cake for 35-40 minutes (for 3, 6-inch cakes), 30-35 minutes (for 2, 8-inch cakes), or 30 minutes (for a 9 x 13-inch pan)- or until a toothpick inserted into the center of the cake comes out clean before removing it from the oven.
- Allow the cake(s) to cool in the pan for about 20-30 minutes. Then remove them from the pan and place them onto a wire rack to cool down completely before frosting. Feel free to wrap cake layers in plastic wrap and refrigerate overnight, if desired.
For the chocolate ganache frosting:
- In a saucepan over medium heat, combine the heavy cream and brown sugar. Whisk the mixture together and bring to a simmer. When the mixture starts to boil, remove the pan from the heat.
- Place the chopped chocolate into the saucepan and let it stand for 3-5 minutes. Then use a rubber spatula to stir the chocolate into the cream until a fully melted, smooth ganache forms. Add in the butter, espresso powder (if using) and salt and continue stirring until the butter melts and everything is well combined.
- Refrigerate the ganache until chilled but spreadable, about 1 – 1 ½ hours. You can also cover and refrigerate the ganache overnight. Note: the ganache will harden the longer it’s chilled; as such, it will need to sit out for about 1 hour to come back up to room temperature to achieve a spreadable consistency for frosting.
- If making a sheet cake, use an offset spatula to spread the ganache onto the cake. For layer cake assembly, use a sharp knife or cake leveler to level the cakes as needed. Then spread an even layer of ganache over each cake layer. Followed by a thin, crumb coat layer of ganache over the entire cake. Then place the cake in the refrigerator to chill for the layers to set, about 30 minutes.
- After chilling, use the remaining ganache to frost the entire cake. Garnish the cake with flowers, sprinkles, shaved chocolate, and other cake toppings, as desired. Slice into wedges and serve immediately. Enjoy!
Notes
- Gluten-free flour: I use Bob’s Red Mill 1:1 baking flour.
- For the chocolate ganache: I recommend 70% dark chocolate.
- Feel free to use all-purpose flour in place of gluten-free flour.
- Please read the blog post in its entirety for more tips + tricks.