Description
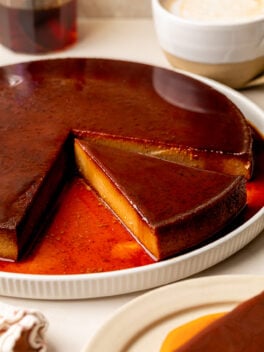
This delectable, easy Flan Recipe has the bones of a classic flan with the elevation of warm spices and dark rum for depth that hits. Flan, a slow-cooked custard, is a traditional Latin dessert that features minimal ingredients. A silky caramel sauce envelopes the firm yet tender custard. The flavors are so warm, rich and inviting, and it’s sooo delicious! It’s a perfect make-ahead dessert to whip up for any occasion!
Ingredients
- 1 (12-ounce) can evaporated milk
- 1 (13.5-ounce) can coconut cream
- 1 (14-ounce) can sweetened condensed milk
- ¼ cup dark rum, preferably Latin or Caribbean (I use Myers’s)
- 5 large eggs
- 1 tablespoon vanilla bean paste
- 1 tablespoon maple extract
- 2 teaspoons ground cinnamon
- 2 teaspoons ground allspice
- 2 teaspoons instant espresso powder
- 1 teaspoon kosher salt
- 1 cup granulated sugar, for flan caramel (syrup)
- ¼ cup water, for flan caramel (syrup)
Instructions
- Preheat the oven. Position an oven rack in the center, and then preheat the oven to 350°F. You will need a 10-inch round cake pan for this recipe. Set it aside.
- Make the custard base. In the body of a high-speed blender, add the evaporated milk, coconut cream, sweetened condensed milk, rum, eggs, vanilla bean paste, maple extract, cinnamon, allspice, espresso powder, and salt. Blitz the mixture until just combined and smooth- careful not to overly blend. Then set the custard base aside while you make the flan caramel (syrup) topping.
- Make the flan caramel (syrup). In a medium saucepan over medium heat, combine the granulated sugar and water. Let the mixture cook until the sugar fully dissolves into the water, about 2-3 minutes. Then increase the heat to medium-high and continue cooking. You should see the mixture go from light brown to golden brown during this process with a bit of bubbling. No worries, the water is evaporating, and the caramel is forming, about 4-5 minutes. Then remove from heat.
- Immediately pour the hot caramel into the cake pan. The cake pan will get hot once the caramel is poured in, so use oven mitts to gently swirl the pan to evenly coat the bottom surface. The sauce will harden quickly, so you want to work quickly. Then set the pan aside to cool and harden, about 5-7 minutes.
- Build flan & water bath. Back to the custard base, since it’s been sitting, use a rubber spatula to give it a swirl to ensure everything is nicely incorporated. Then gently pour the custard base into the baking pan right on top of the hardened caramel. Cover the flan loosely with foil. Carefully place the baking pan into a larger pan (like a roasting pan) to create a water bath. Then place the pan(s) into the oven and fill the larger pan with about 1 inch of boiling water from a kettle.
- Bake. Let the flan bake at 350°F for 1 hour and 15 minutes- until the center is firm with a little jiggle when nudged. Carefully remove from the oven and set aside to cool to room temperature. Afterward, transfer the covered flan to the refrigerator to chill and set for at least 4 hours or overnight (for best results).
- Serve. To serve, run a small knife around the edge of the pan and use a large platter to invert the flan onto it. I like to apply a few taps to the bottom of the pan (as if you’re beating a drum) to help loosen the flan. Then gently lift the cake pan and walaa! Slice the flan into wedges and serve. Enjoy!
Notes
- Storing: Keep your flan stored, covered, in the fridge at all times when not serving. It will keep for 4-5 days in the fridge.
- Please read blog post in its entirety for more tips + tricks.