BEST Artisan No Knead Bread Recipe (Overnight Method)
This artisan No-Knead Bread recipe is for home cooks and bakers who appreciate quality, homemade bread. Unlike mass-produced bread, this artisan Dutch oven bread recipe has deep flavor, an incredible crumb and interior structure, and it’s unbelievably easy to make! Prep the dough a day ahead and let it rest on the counter overnight, then bake away on the following day. You’ll wanna make a batch weekly!

One of my favorite things that I’ve been tapping into as of late is bread-making. The development of homemade bread recipes has been something that has intimidated me until I started learning all about it.
I’ve been leaning into different types of breads, bagels, focaccia, pizza crusts, and everything in between. This artisan bread recipe has been one of my top go-to’s and I’m so excited that it’s now on the site for you!

Simply Perfect, No Knead Bread 🍞
You know the fresh bread loaves you can source at a farmer’s market or your local bakehouse? Well, this no-knead bread recipe gives a similar vibe to its artisan-style nature and flavor. Don’t let making bread intimidate you because this recipe is super easy to whip up, no matter your skill level.
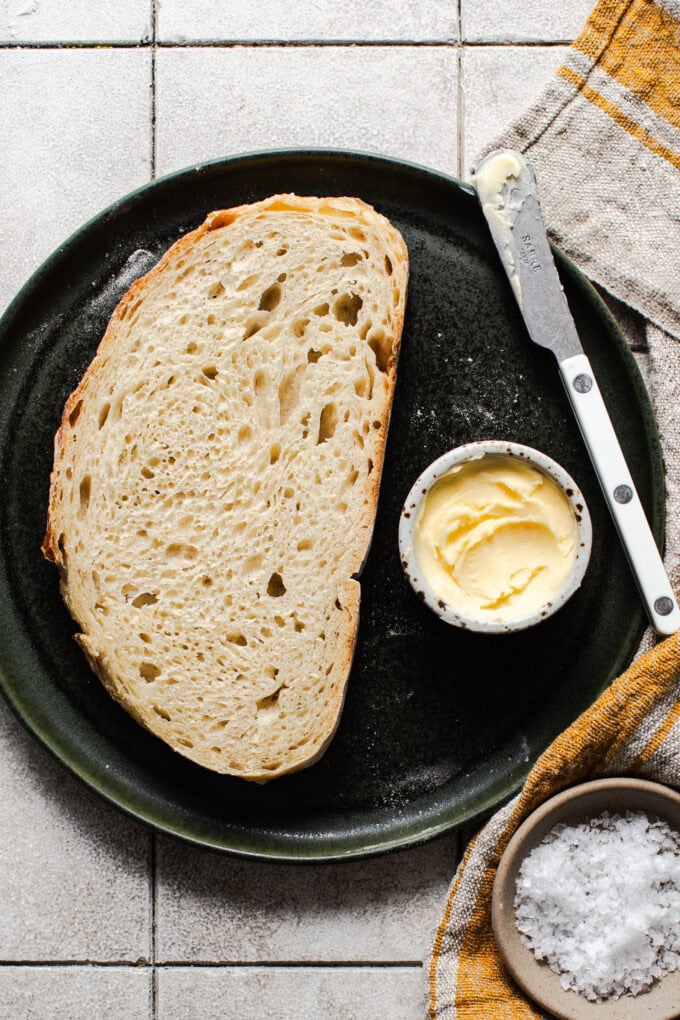
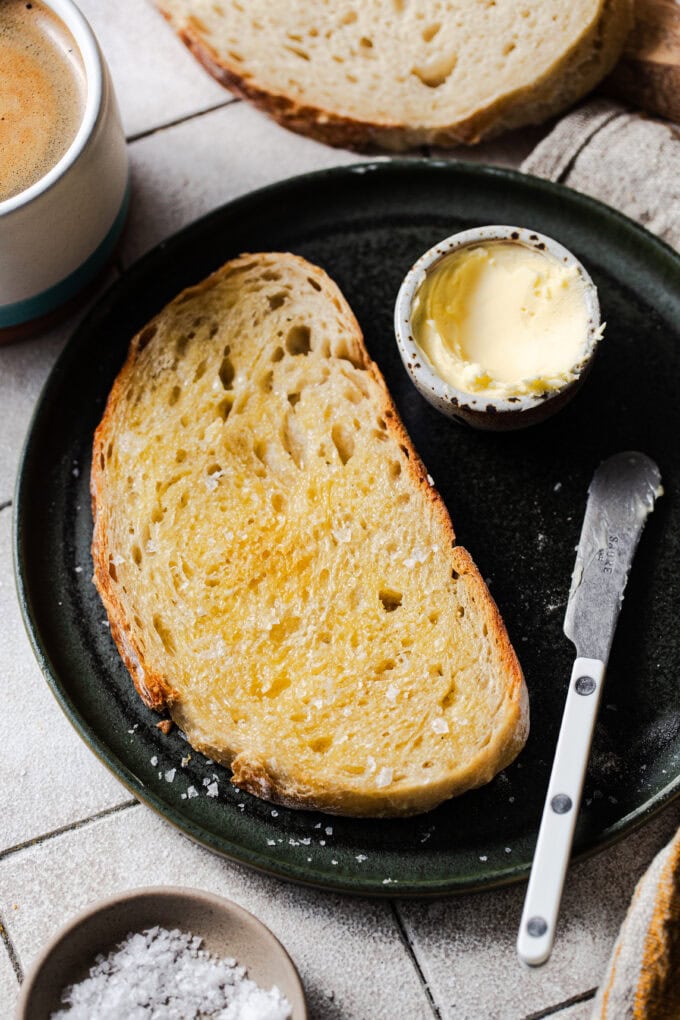
This scratch-made, no knead bread recipe is great for sandwiches, toasts, and any other way you’d like to consume bread, ha. There ain’t nothing quite like fresh, homemade bread for you and your peeps to enjoy!
What You’ll Need For This Bread Recipe:
(Note: the full ingredients list, including measurements, is provided in the recipe card directly below.)
For starters, this recipe contains only *FIVE* ingredients…
- Bread flour: I prefer the use of bread flour for this no knead bread recipe because of its higher protein content. Oftentimes, the higher the protein content, the more gluten. Think airy, chewy, and taller bakes with this type of flour as opposed to all-purpose.
- Sea salt: For flavor and depth.
- Yeast: This bread recipe is a yeasted dough bread.
- Diastatic malt powder: Also known as dry malt powder, this ingredient is considered to be a dough conditioner. It lends a delicate, malty, nutty, and rich flavor when used in baking. Diastatic malt powder also reacts with the yeast during fermentation to allow breads to be chewy in the center and crispy on the crust. This singular ingredient gives the bread that signature bakery-style taste.
- Water: To bring the bread dough together, we need that h20.
How To Make Homemade Bread:
(Note: please see the recipe card directly below for the complete written instructions.)
- Make the dough. In a large bowl, combine the bread ingredients and stir. At this stage, you’re just bringing it all together until the dough forms. It’s a no knead bread recipe, so it’s pretty hands-off. Yay!
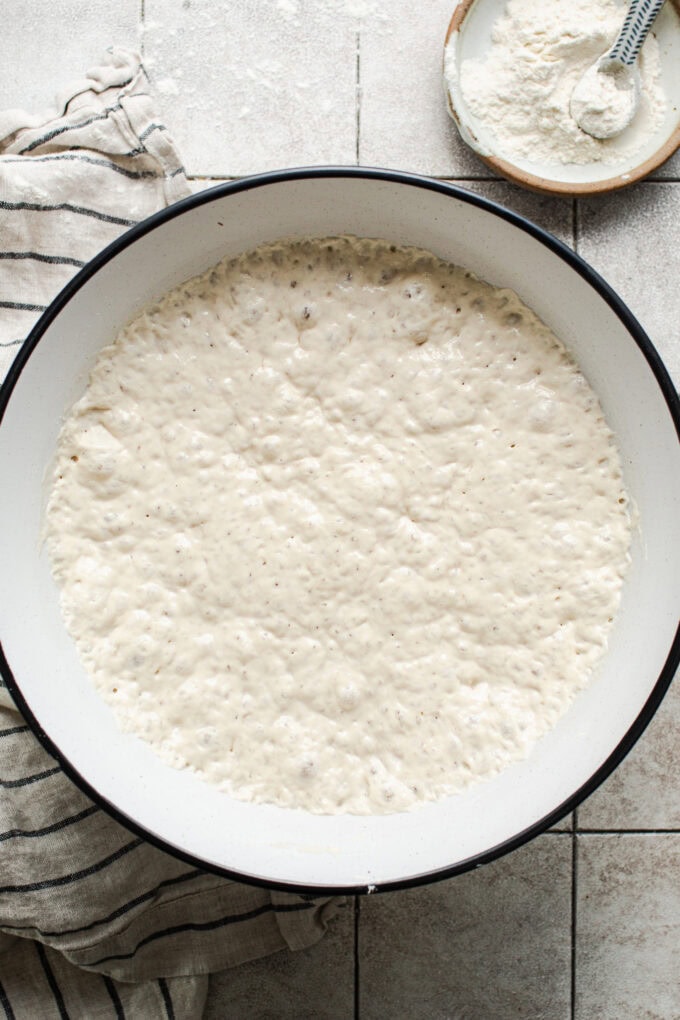
- Room temperature proofing. Then cover the bowl with a lid or tightly with plastic wrap. Leave the dough on the counter overnight to proof for 12 to 18 hours. Yes, leave it right on the counter at room temperature.
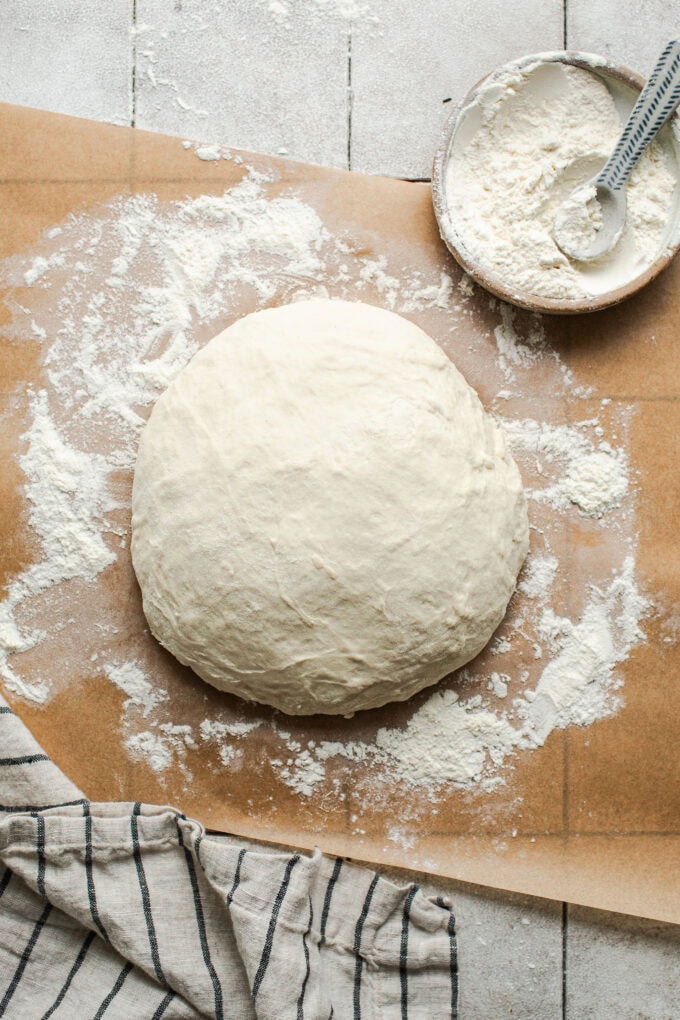
- Shape the dough. When ready, transfer the dough onto the floured surface. Use your hands to shape the dough into a round ball. Once you’ve got a nice round ball with a smooth top, sprinkle the top with a bit of flour. Then, place the dough mass onto a large sheet of parchment paper and let the dough rest while the oven preheats.
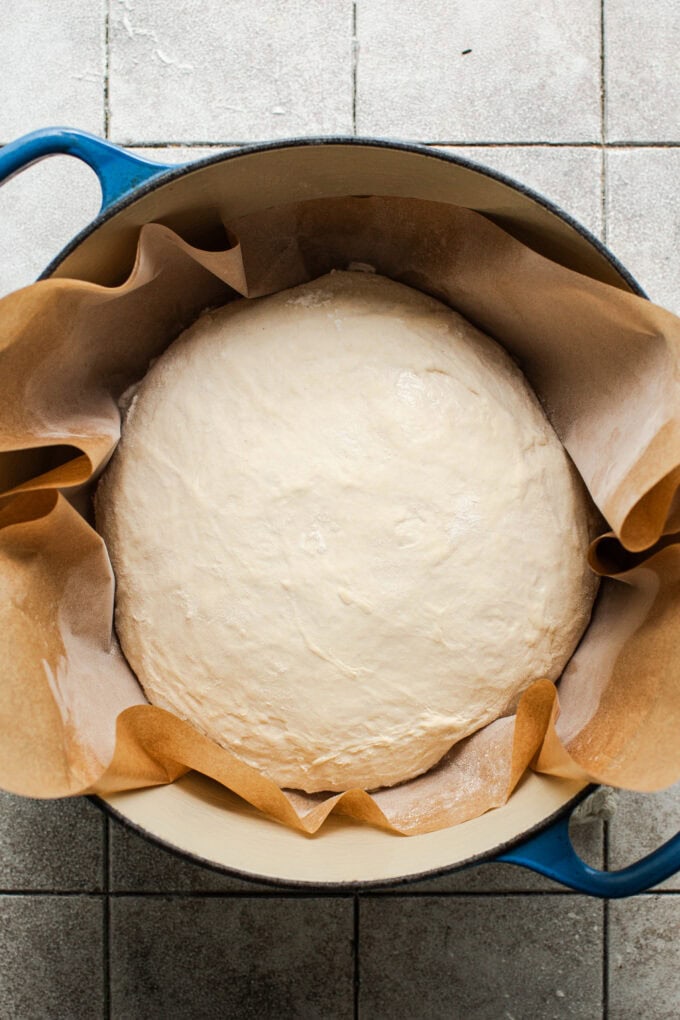
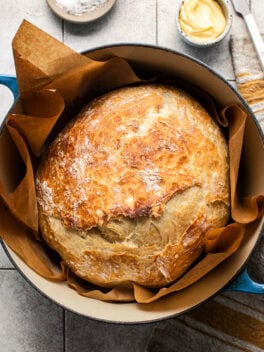
- Prep dutch oven & preheat the oven. Place a large dutch oven into the oven, and preheat the oven to 450°F.
- Bake the bread. Use oven mitts to carefully remove the hot dutch oven from the oven and remove the lid. Gently lift the sides of the parchment paper that the dough is on and place it into the hot dutch oven with the sides of the parchment paper upright. Cover with a lid. Bake the bread for 30 minutes. Then remove the lid and continue baking for 10-15 minutes, until the bread surface is golden brown with a crisp texture.
Equipment You’ll Need For Baking Bread:
- Dutch oven– This is crucial and the actual “bread oven” for the loaf to steam/bake in. Any oven-safe dutch oven will work.
- Parchment paper– The bread loaf will sit on parchment paper, allowing you to both lower and lift the bread in and out of the baking vessel.
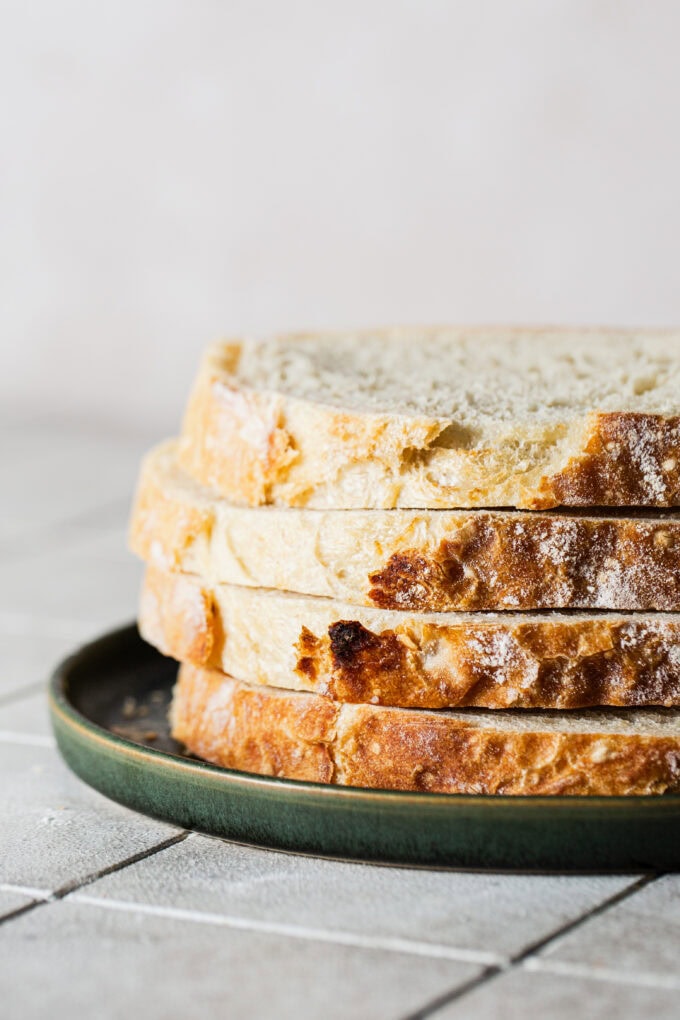
- & honorary mention– a bread knife for perfect slicing!
Tips + Tricks For The Best No Knead Bread:
- Make the recipe as written & directed. Yes indeed, this is the plain truth for the best results, my friends 💛.
- Use a kitchen scale. This one is great! Because flour is such a finicky ingredient to measure in cups, I’ve provided the weighted measurement for precise accuracy.
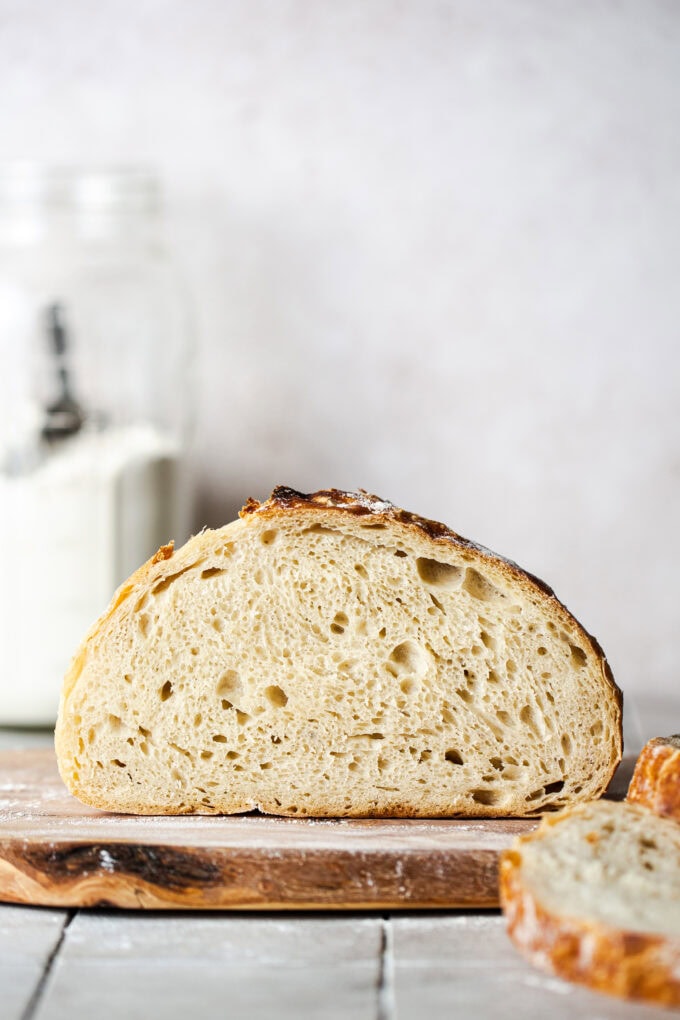
- Let the bread cool completely. While the urge to slice immediately will be strong, it’s important to let the bread cool completely before slicing and serving. This prevents you from ending up with bread that has a gummy interior, I don’t want that for you.
Bread Variations & Inclusions:
Here are some ways you can add a lil flair to your bread…
- Can I score my bread before baking? While not necessary, you can use a bread lame tool to add some cool little designs to your bread before baking!
- Add herbs & seasonings– Think fresh rosemary or dry herb seasonings like a sprinkle of Italian seasoning or everything bagel seasoning. Any herbs/seasonings will need to be stirred in at the dough prep stage (step #1).
- Fresh grated cheese– Think fresh grated parmesan or asiago/cheddar cheese, again, stir these items in at the dough prep stage (step #1).
- Fresh garlic– If you’re a garlic lover, some fresh grated garlic or minced garlic stirred into the prepped dough will be so delicious!
Storing & Reheating Your Fresh Baked Bread:
→ Storing (fridge & freezer): Transfer leftover bread into your bread box or (bread bags) plastic bags with a good seal. You can keep the bread stored on the counter for up to 3 days or in the freezer, where it will keep for up to 2 months. Thaw bread under refrigeration.
→ To reheat: Reheat in the oven at 350°F for 5-10 minutes or in the toaster until warmed through.
This No Knead Bread recipe is a recipe you’ll want in your scratch-made arsenal, y’all. It’s just so good and super easy! Be sure to tag @butterbeready in your BBR recipe creations, I sure love to see it when you do. Until next time! 🤟🏾
More homemade bakes:
- Homemade Cinnamon Rolls
- Red Velvet Cake
- Dutch Apple Pie
- Layered Carrot Cake
- Sweet Potato Rolls
- Flourless Chocolate Cake
BEST Artisan No Knead Bread Recipe (Overnight Method)
- Prep Time: 15 minutes
- Cook Time: 45 minutes
- Total Time: 1 hour
- Yield: 10
- Method: Baking
Description
This artisan No-Knead Bread recipe is for home cooks and bakers who appreciate quality, homemade bread. Unlike mass-produced bread, this artisan Dutch oven bread recipe has deep flavor, an incredible crumb and interior structure, and it’s unbelievably easy to make! Prep the dough a day ahead and let it rest on the counter overnight, then bake away on the following day. You’ll wanna make a batch weekly!
Ingredients
- 4 ½ cups (740 grams) bread flour, plus more as needed
- 3 teaspoons fine sea salt
- 1 teaspoon instant yeast
- 2 teaspoons diastatic malt powder
- 2 ¼ cups warm water (about 110–115°F)
Instructions
- Make the dough. In a large bowl, combine the bread flour, salt, yeast, and diastatic malt powder. Whisk the dry ingredients well to thoroughly combine. Then add the warm water. Use a rubber spatula to mix the ingredients until the liquid is absorbed and the dough combines with no major flour pockets remaining. The dough should be somewhat shaggy and slightly sticky.
- Rest the dough, room temperature proofing. Then cover the bowl with a lid or tightly with plastic wrap. Leave the dough on the counter to proof for 12 to 18 hours.
- Shape the dough. Use your hands or a fork to help deflate the dough, releasing it from the sides of the bowl and pulling it towards the center into one mass. The rested dough should be a bit sticky, a tacky/blobby mass, but it holds its shape after a few stretches to the center. Sprinkle your work surface well with flour. Then transfer the dough onto the floured surface. Use your hands to shape the dough into a round ball- working the outer edges into the bottom center to help mold the shape. If the dough feels sticky, sprinkle it with more flour as needed. Once you’ve got a nice round ball with a smooth top, sprinkle the top with a bit of flour. Then use a bench scraper to move the dough mass onto a large sheet of parchment paper. Cover the dough with a loose kitchen towel and let the dough rest while the oven preheats.
- Prep dutch oven & preheat the oven. Position an oven rack in the center and place your dutch oven with lid into the cold oven. Then preheat the oven to 450°F.
- Bake. Use oven mitts to carefully remove the hot dutch oven from the oven and remove the lid. Gently lift the sides of the parchment paper that the dough is on and place it into the hot dutch oven with the sides of the parchment paper upright. Cover with a lid. Place the pot into the oven to bake the bread for 30 minutes. Then remove the lid and continue baking for 10-15 minutes, until the bread surface is golden brown with a crisp texture. Let the bread rest in the pot for 10 minutes, and then carefully lift the bread out and place it onto a cooling rack. It’s important to let the bread cool completely (about 1-2 hours) before slicing and serving. Enjoy!
- Storing & reheating notes: Transfer extra servings into your bread box or (bread bags) plastic bags with a good seal. You can keep the bread stored on the counter for up to 3 days or in the freezer, where it will keep for up to 2 months. Thaw under refrigeration. Reheat in the oven at 350°F for 5-10 minutes or in the toaster until warmed through.
Notes
- Please read blog post in its entirety for more tips + tricks.
Recipe by: Quin Liburd- Butter Be Ready
Photography by: Ashley McLaughlin

